We
recently taught a 6-lesson elective on "DIY Art History" to a
mixed age classroom (6-13). Each post on this blog describes one lesson.
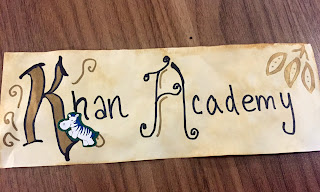
 After mosaics, we decided to talk about illuminated manuscripts from the middle ages. They're beautiful, they're fun to make, and they motivate discussions about how we humans try to use art to convey the written word - and what gets lost in the process.
We split this lesson into 2 parts so that we could have 2 DIY activities - first an illuminated nameplate, then an illustrated creature crowd-sourced from a game of picture telephone. We didn't have enough time for the second activity because of how long picture telephone took with the younger kids, so we assigned that as bonus work.
 |
| My example illuminated nameplace |
 |
| One of the pages from our game of picture telephone - look at that beast! |
Here's the presentation, lesson plan, supplies, and additional resources:
Presentation:
Lesson Plan:
Part 1:
- Pass illuminated manuscripts around
- Slide: These are called illuminated manuscripts
- Q: why do you think its called it?
- A: break it down: “illuminated” “manu” “script”
- Slide: When were they made?
- Q: When do you think this is from? A: Click the slide, 500-1500.
- Slide: What were they composed of?
- Q: Why do you think they’re called miniature? A: It actually comes from “minium”, the red pigment, and since they happened to be small, now we think of miniatures as small things.
- Slide: Who made manuscripts?
- Q: Who do you think made them? (Look at the images in the slide) A: Click the slide - monks in the “scriptorium” in monasteries.
- Point out that this was how monks signed their work, by drawing themselves in the letters.
- Slide: Monasteries
- Monasteries are where monks spend all day praying and studying religion, and doing work like making manuscripts.
- Slide: Gospels
- That was the first most popular type of manuscript.
- Q: Anyone know what a gospel is? A: First four books of the new testament
- Slide: Other types of religious books
- Gospels (Matthew Mark Luke John)
- Book of Kells
- Bibles
- Psaltars
- Songbooks
- Slide: How did they make them?
- Parchment: Stretched the skin of calves, then cut into squares.
- Scribe: Quill and knife. The knife was how they undid.
- Illuminator: Gilded details & painted details.
- Binding: Used metal clasps, fabric. Special bindings were called “treasure bindings.”
- Slide: Why did we stop making them?
- A: Click slide -- the printing press. It was cheaper to use the new technology.
- (15 min) DIY: Name with a historiated initial
- Fancy paper, cut into namebadge-length strips
- Put a timer up
Part 2:
- Pass a bestiary around
- Slide: Secular manuscripts
- Universities started forming around 11-1200, and people made manuscripts like textbooks. Also rich nobles commissioned manuscripts.
- Q: What are these manuscripts showing? A: First example on slide is a battle scene between Alexander and Darius. Second example is a Persian horoscope.
- Slide: Bestiaries
- Medieval encyclopedia of real and imagined beasts
- Describes physical and moral qualities
- Copied by hand, resulting in lots of variations
- Slide: Bestiary Fox:
- Here’s a picture of a Fox from a bestiary, with a bird on his mouth.
- Q: Why do you think they showed foxes that way? A: They thought of foxes as very cunning creatures, so this is a fox playing dead.
- Slide: Bestiary’s influence:
- Q: A lot of creatures that we think of today come from bestiaries. Can you think of any? A: Mermaid, unicorn, mandrake (which was in Harry Potter).
- Slide: Picture Telephone
- Q: Have any of you played telephone? We’ll play a game like that.
- It will help us see how scribes might have changed things over time.
- (15 min) Activity: Picture telephone
- Split into 2-3 circles of 5-7.
- Role-play in front, showing them an example. Or have one teacher show in each group.
- Give each person a paper booklet.
- Start with the description of a beast - give it a personality (“A mean rabbit with duck feet.”)
- When you get to the last page, share all the booklets and see how they transformed.
- (20 min) DIY: Bestiary
- Draw and illuminate your final animal. (You may not like how other people changed your beast, but most scribes didn’t get to pick.)
- Come up with a name for your animal.
- Draw it and write the description.
Supplies
We got most of our supplies from the local SCRAP store in SF, but I've included Amazon links to similar items for convenience.
- Paper telephone booklets (cut paper and staple together)
- Antiqued paper (one name strip for each student, plus extras)
- Print-outs of example manuscripts: P Manuscript
- Print-outs of borders: Borders
- Print-outs of historiated letters: Alphabet 1, Alphabet 2, Alphabet 3, Alphabet 4, Alphabet 5
No comments:
Post a Comment